
Tags
Backyard Party, Blush, Cricut, Cricut Design Space, Cricut Explore, Design Ideas, Design Space Star, Dinner Party, DIY, Entertaining & Gathering, Floral, Garland, Paper Flowers, Paper Peony, party, Party Decor, Peonies, Pink, Place Card, Place Setting, Reception, Tablescape, Tabletop, Thanksgiving, Wedding, Wood, Woodland

image by Melanie Artz, Artzy Creations
Yesterday I shared the first half of the Woodland Tablescape Melanie and I teamed up to create for this month’s Cricut Design Space Star Challenge – and I’m very excited to share today’s post about the peony garland centerpiece. Peonies are my favorite flower. One alone makes an impression, thanks to its amazing bloom. Gather five or more and they make an incredible impact on any table. For this portion of the challenge, it seemed like the perfect way to see their lovely blooms even though they are out of season (like way out of season).
Overall these were easy to put together once I got into a rhythm. Time was the main commitment. To do these seven, from cutting to assembly to ink spraying – not including dry time though – it was about 2.5 hours. I let them completely dry overnight on cardboard before storing them in large, clear shoe containers to keep them safe.
Supplies:
1 Roll of White Poster Paper
1 Bottle of Blush Ink Pad Refill
1 Bottle of Harvest Ink Pad Refill
1 Bottle Gold Sheer Shimmer Mist
2 Spray Bottles
Cricut Light Grip Mat
Cricut Scraper
Cricut Standard Blade (comes with Cricut Explore)
Scissors
Double-sided tape
Green Floral Wires
Faux Boxwood Garland
Cardboard or heavy butcher paper
Design Space Link:
Peonies for Garland
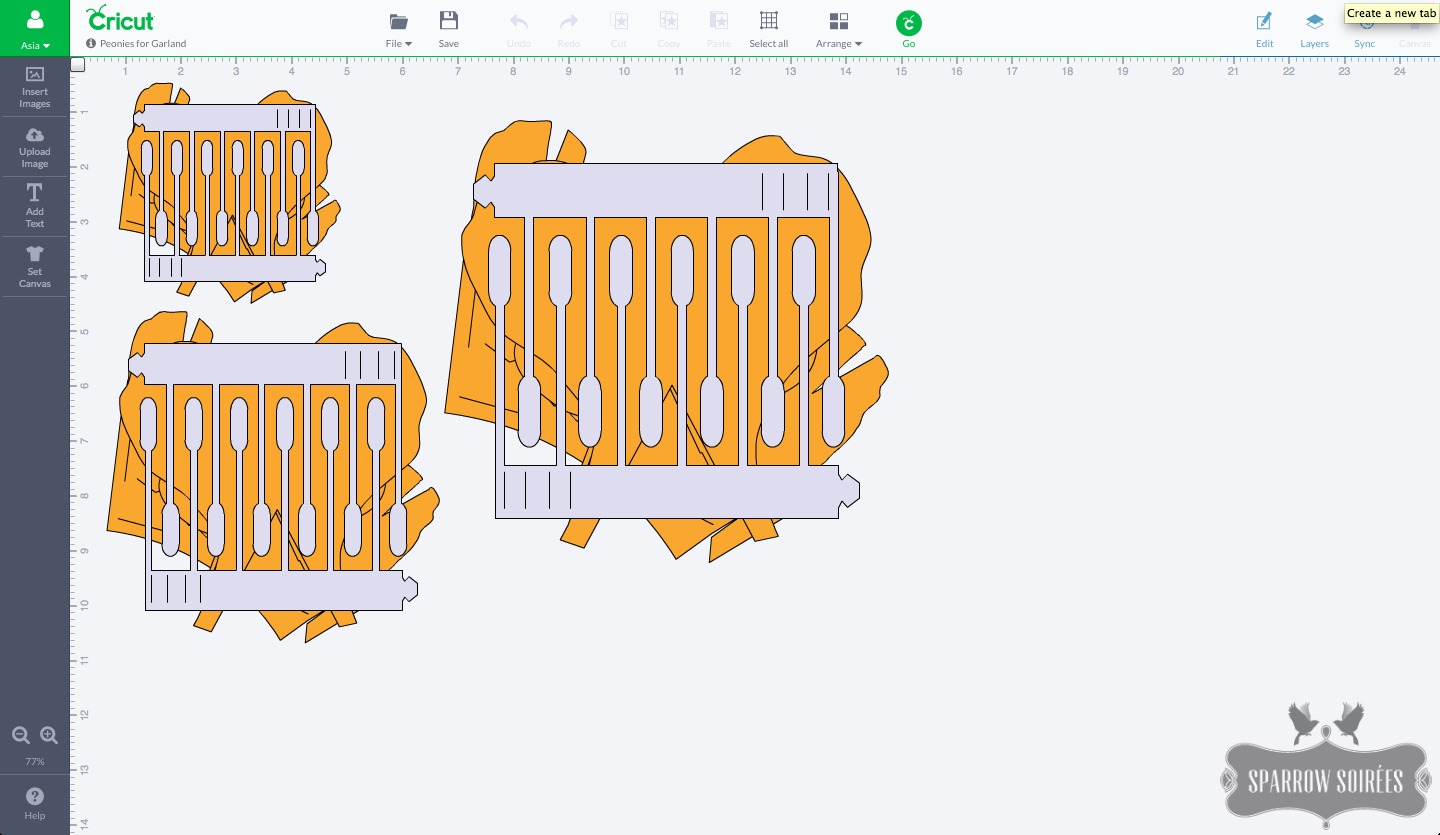 I created three different peony sizes in the Design Space: 4″, 6″, and 8″ and had two sets cut. I also included my prototype in the tablescape. If you use a 12×12 mat, you’ll need to cut 13 sheets from the roll. If you have a 12×24 Standard Grip Mat that has lost a lot of stickiness (basically making it a long Light Grip Mat), you’ll need seven sheets. Then came the assembly…
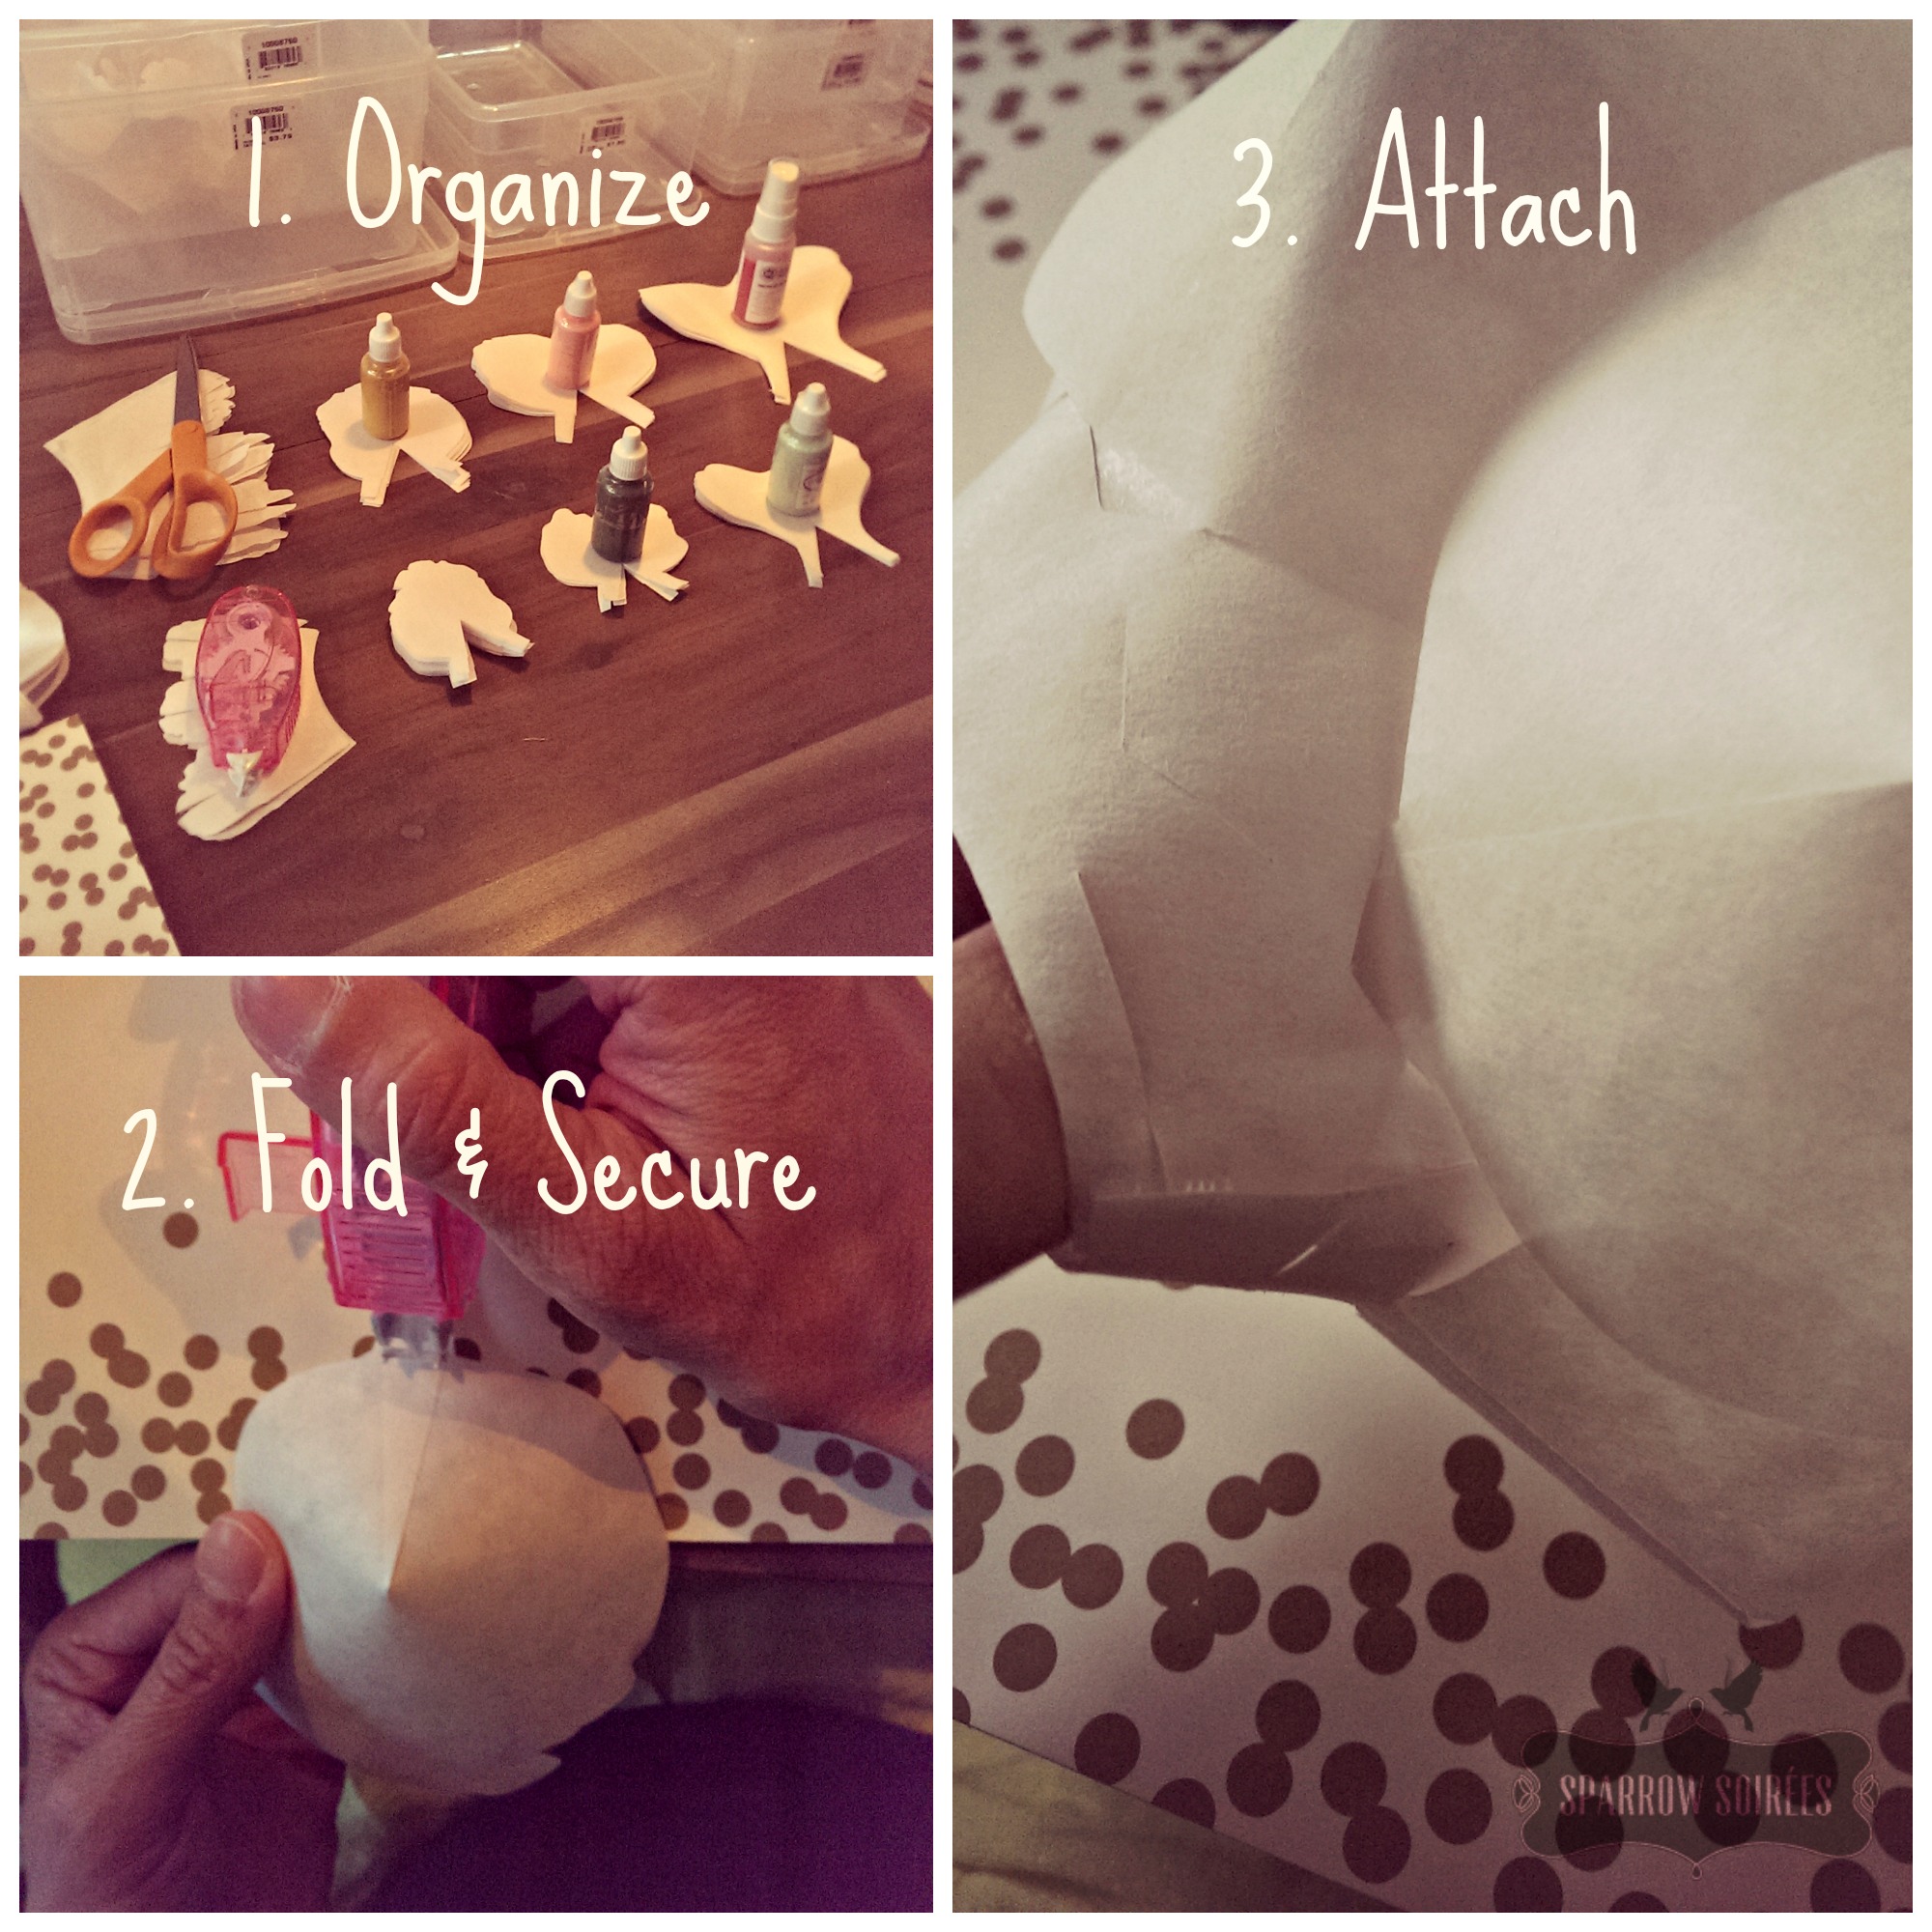 1. While the Explore was cutting, I organized the pieces that had been pulled off the mat. This saved a lot of time during the assembly since the Explore combined all the sizes in its cutting layout.
2. Follow the assembly directions in Cricut’s Giant Flower Book PDF. I found it was easiest to fold and secure the lower tabs using a tape roller, and then rolled a small piece of tape along the tab’s backside to help it stick to the “crown” (this will make complete sense when you make them). Just FYI: I used the tape roller instead of glue because a) it’s less messy, and b) prevents possible glue marks showing once the ink mixture dries.
3. Insert the petal tabs into the slits per the directions and press the tab firmly so it sticks to the crown. Leave out the filament pieces (the flower’s leggy inner part) since those pieces need to be sprayed with the ink mixture.
Trial & Error: insert the tabs into slits, instead of just attaching them to the outside of the crown, and pull them as far as they’ll go since the petals are fairly top-heavy. This will also allow them to hold their shape. Having the tape on the tab’s backside and securing it the crown will prevent them from falling out (they fall out easily otherwise).
 4. To color the blooms, mix a 1/4 cup of water with a few drops (about 1.5 teaspoons) of the blush ink in a spray bottle and give it a good shake. On a piece of cardboard, place the blooms upward and spray them with the ink mixture. You might have to move a few petals to make sure the mixture covers the bloom, but don’t worry about coating the petals evenly. Turn the blooms over to spray the underside and let them drip-dry facing down. This will help the paper curl a bit inward as it dries, making the petals look a little more natural. Once the blooms are mostly dry, add a little more water to the spray bottle, use a tablespoon of the blush ink and shake to mix. The mixture should look darker, possibly neon while spraying. Turn the blooms upward to mist the inside first since this will create definition on the petals. Turn them over to mist the underside and let the blooms dry facing downward. After 10-20 minutes, move the blooms to dry spots on the cardboard to finish drying.
  5. Repeat the same process for the filament pieces with the Harvest ink, turning them over to cover both sides. If they aren’t dark enough for your liking after they dry, add more ink (skip the water) and spray again. Then spray evenly with the metallic shimmer. After 10 minutes, move them to dry spots on the cardboard for drying and prevent sticking. Leave the blooms and filaments to completely dry overnight.
If you wish to use these long-term or if they’ll be worn/handled a lot, I’d suggest spraying the dry blooms with an acrylic spray for extra protection since the ink mixture can flake a little bit. The filaments are fairly well protected thanks to being inside the bloom and the metallic shimmer spray.
6. Finish assembling the blooms by placing the filament inside the crown. I rolled a small piece of tape on outside of the filament’s ring to help secure it. I then slipped the wire through the base, twisted to secure, and then attached it to the garland.
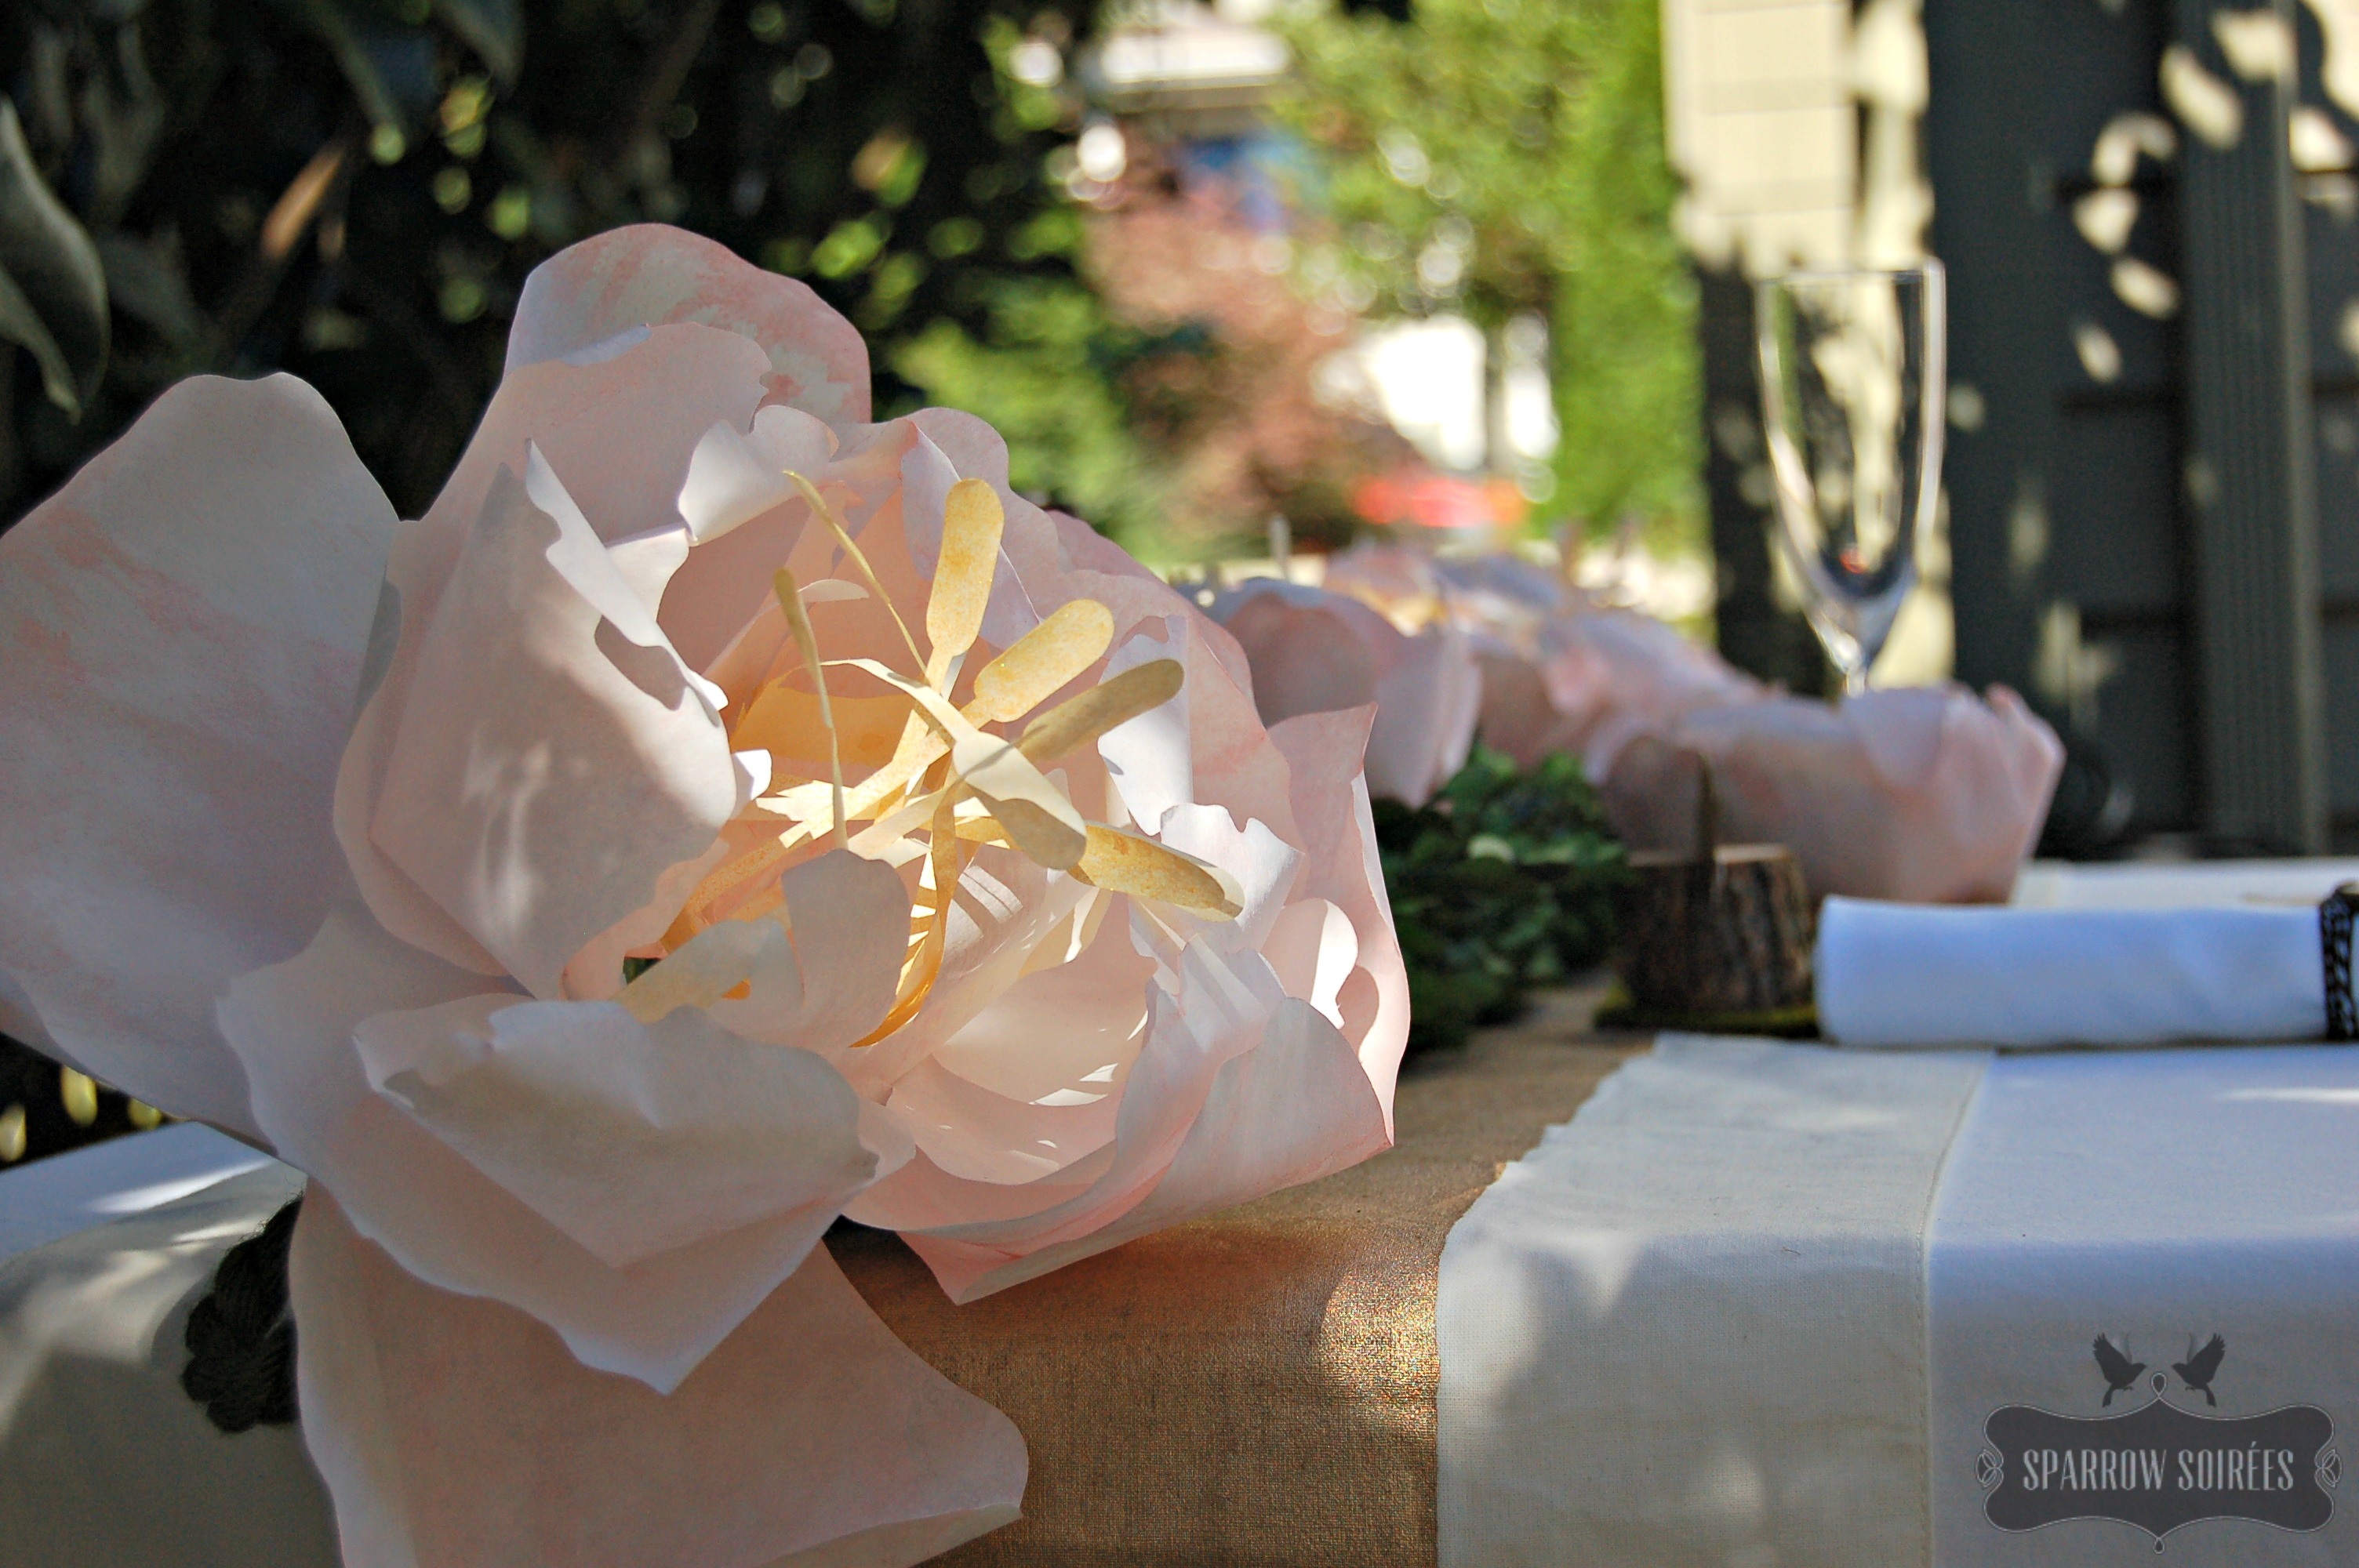
 To help prevent the garland appearing too crowded, I spaced the peonies and used one in the place setting. I loved the different sizes and elegant impact thanks to the pop of blush against the boxwood garland. The bit of gold shimmer totally catches your eye when the light hits it.

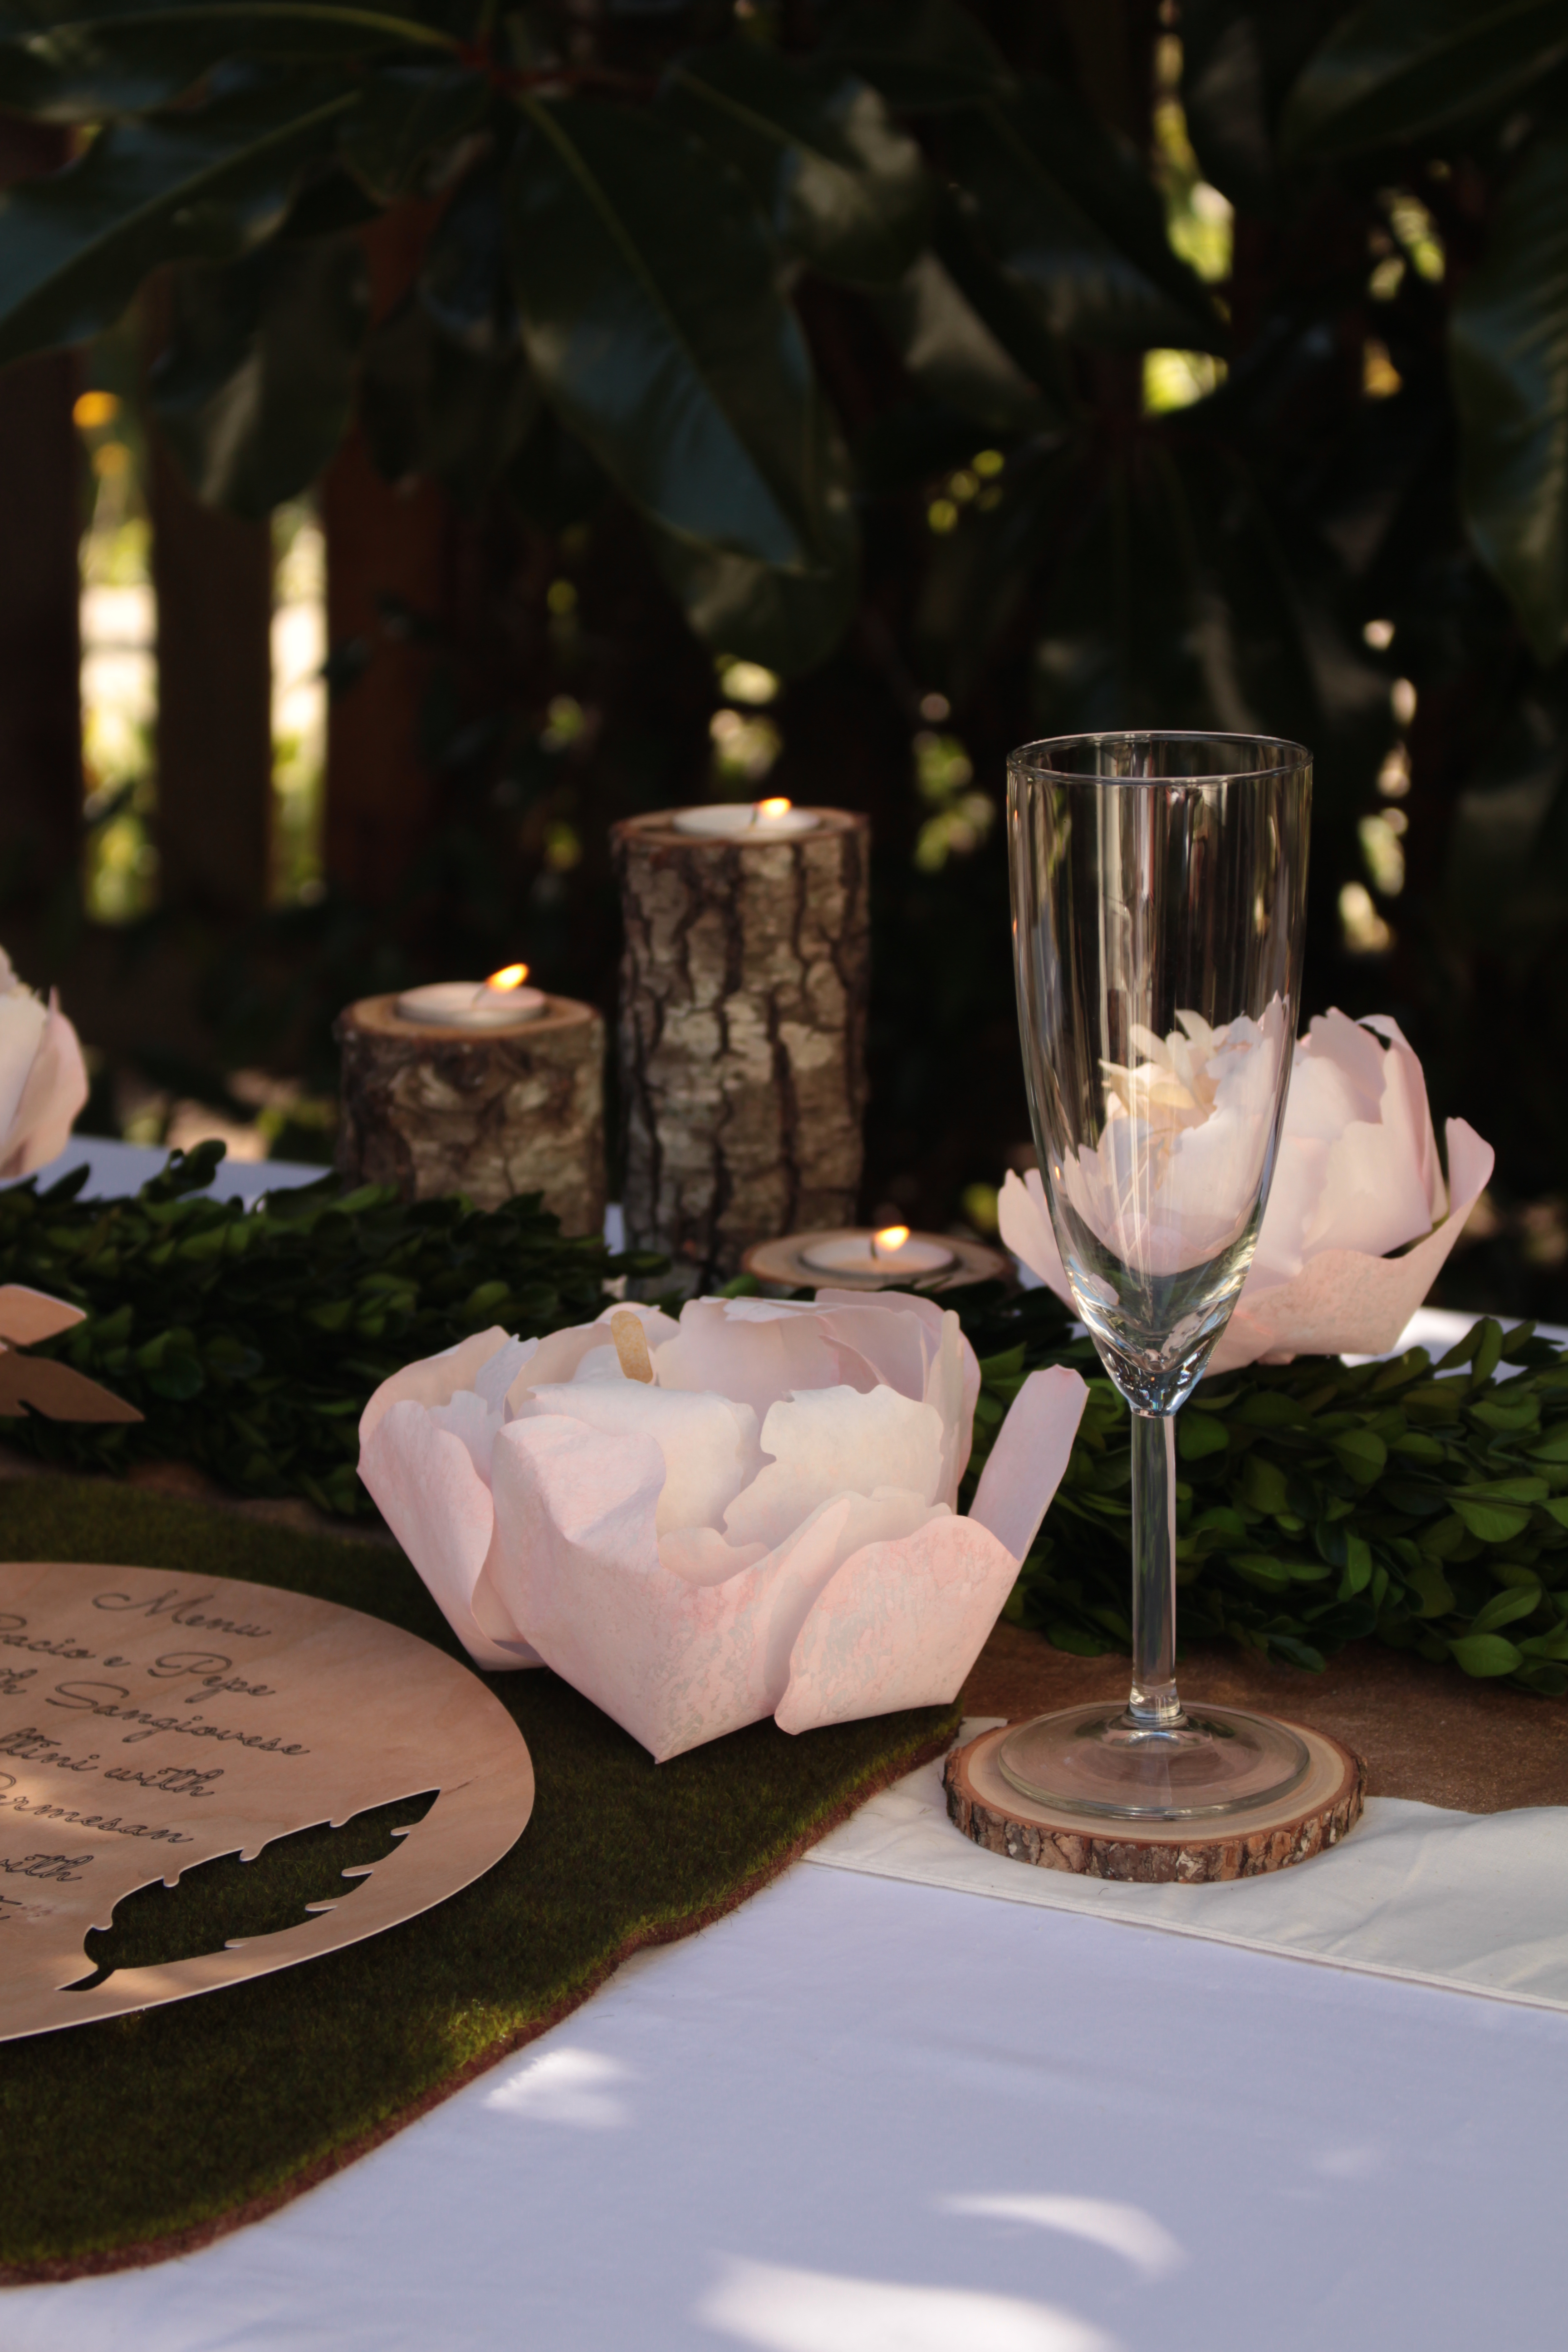
Thank you so much to Church House Woodworks for allowing us to use the coasters, votive holders and pendants for this shoot! Image by Melanie Artz, Artzy Creations
 I love these so much I think I’ll make a few more (or maybe enough for a backdrop!?) for my birthday party in January. They’re so light and warm. Perfect for a cold winter night. Using the ink mixture allows them to be perfectly matched for any color scheme so whether it’s peonies or pansies, you can create your favorite flowers any time of the year. Thanks Cricut!
Be sure to check out the my fellow design team members’ posts (I’ll update as the posts go live): The Happy Scraps: Paper Bridal Bouquet // Classically Quirky: DIY Instagram Table Number/Advent Calendar Wall // Artzy Creations: Paper Flower Chandelier // Ameroonie Designs: DIY Custom Word Art // Seven Thirty Three: Rustic Invite // Brewed Together: DIY Photo Booth Props // Pencil Shavings Studio: Monogram Favor/Gift Tags // Everyday Party Mag: Woodland Centerpiece Candles
As promised, before I wrap up, the Cricut I Made It! Contest:

To enter the Cricut I Made It! contest, visit their site to get the details. You have until 9/30/14 to enter so start creating! (BTW – staying at SLC’s Grand America Hotel with a weekend to kick back in Park City?! I wonder if I can enter??) Good luck!
Thank you so much for stopping by and reading about my Design Space Star submissions. I’ll post the gift idea later this week. Oh – and once Cricut pins my submissions to their Design Space Star Pinterest Board, I’d be honored if you could repin my images to your own Pinterest boards (repins are taken into consideration during the judging period). Thank you again!
UPDATE: if you happen to be on Pinterest, it would mean the world to me if you could please repin the images from Cricut’s Design Space Star board, and here are the links: the place-card, the menu, the centerpiece and the leather cheers notebook/album! Thank you so much!
Disclosure: This post contains affiliate links. I’m also a member of Cricut’s Blogger Network. I may receive prizes in exchange for a winning project with Cricut Design Space Star. All opinions are 100% my own.
—Come hang out with this lil’ bird!
like sparrow | tweet with sparrow | sparrow’s pins | sparrow’s snaps

Pingback: Halloween Sign DIY {Cricut Design Space Star Challenge}
Pingback: DIY Cheers Notebook & Album {cricut design space star challenge) | The Sparrow's Nest
Pingback: DIY Rustic Wedding Invitations - seven thirty three
Pingback: A Woodland Tablescape {cricut design space star challenge} | The Sparrow's Nest
Pingback: Woodland Centerpiece Candles {Cricut Design Space Star Challenge} - Everyday Party Magazine
Kathy T. said:
Pretty!!!
arv said:
Thank you so much Kathy! xo